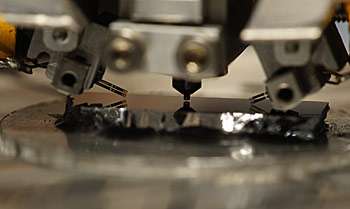
New NIST nanoscale indenter takes novel approach to measuring surface properties

Researchers from the National Institute of Standards and Technology (NIST) and the University of North Carolina have demonstrated a new design for an instrument, a "instrumented nanoscale indenter," that makes sensitive measurements of the mechanical properties of thin films—ranging from auto body coatings to microelectronic devices—and biomaterials. The NIST instrument uses a unique technique for precisely measuring the depth of the indentation in a test surface with no contact of the surface other than the probe tip itself.
Indenters have a long history in materials research. Johan August Brinell devised one of the first versions in 1900. The concept is to drop or ram something hard onto the test material and gauge the material's hardness by the depth of the dent. This is fine for railway steel, but modern technology has brought more challenging measurements: the stiffness of micromechanical sensors used in auto airbags, the hardness of thin coatings on tool bits, the elasticity of thin biological membranes. These require precision measurements of depth in terms of nanometers and force in terms of micronewtons.
Instead of dents in metal, says NIST's Douglas Smith, "We are trying to get the most accurate measurement possible of how far the indenter tip penetrates into the surface of the specimen, and how much force it took to push it in that far. We record this continuously. It's called 'instrumented indentation testing'."
A major challenge, Smith says, is that at the nanoscale you need to know exactly where the surface of the test specimen is relative to the indenter's tip. Some commercial instruments do this by touching the surface with a reference part of the instrument that is a known distance from the tip, but this introduces additional problems. "For example, if you want to look at creep in polymer—which is one thing that our instrument is particularly good at—that reference point itself is going to be creeping into the polymer just under its own contact force. That's an error you don't know and can't correct for," says Smith.
The NIST solution is a touchless surface detector that uses a pair of tiny quartz tuning forks—the sort used to keep time in most wrist watches. When the tuning forks get close to the test surface, the influence of the nearby mass changes their frequency—not much, but enough. The nanoindenter uses that frequency shift to "lock" the position of the indenter mechanism at a fixed distance from the test surface, but without exerting any detectable force on the surface itself.
"The only significant interaction we want is between the indenter and the specimen," says Smith, "or at least, to be constant and not deforming the surface. This is a significant improvement over the commercial instruments."
The NIST nanoindenter can apply forces up to 150 millinewtons, taking readings a thousand times a second, with an uncertainty lower than 2 micronewtons, and while measuring tip penetration up to 10 micrometers to within about 0.4 nanometers. All of this in done in a way that can be traceably calibrated against basic SI units for force and displacement in a routine manner.
The instrument is well suited for high-precision measurements of hardness, elasticity and creep and similar properties for a wide range of materials, including often difficult to measure soft materials such as polymer films, says Smith, but one of its primary uses will be in the development of reference materials that can be used to calibrate other instrumented indenters. "There still are no NIST standard reference materials for this class of instruments because we wanted to have an instrument that was better than the commercial instruments for doing that," Smith explains.
More information: B.K. Nowakowski, D.T. Smith, S.T. Smith, L.F. Correa and R F. Cook. Development of a precision nanoindentation platform. Review of Scientific Instruments, 84(7), 075110, DOI: 10-1063/1.4811195, (2013). Published online July 18, 2013.
Journal information: Review of Scientific Instruments
Provided by National Institute of Standards and Technology


